Proxmox is a debian based open-source virtualization platform. It combines a hypervisor and container-based virtualization, allowing you to run KVM virtual machines, LXC containers, manage storage, networking resources, pass through hardware etc, all from a single web based interface.
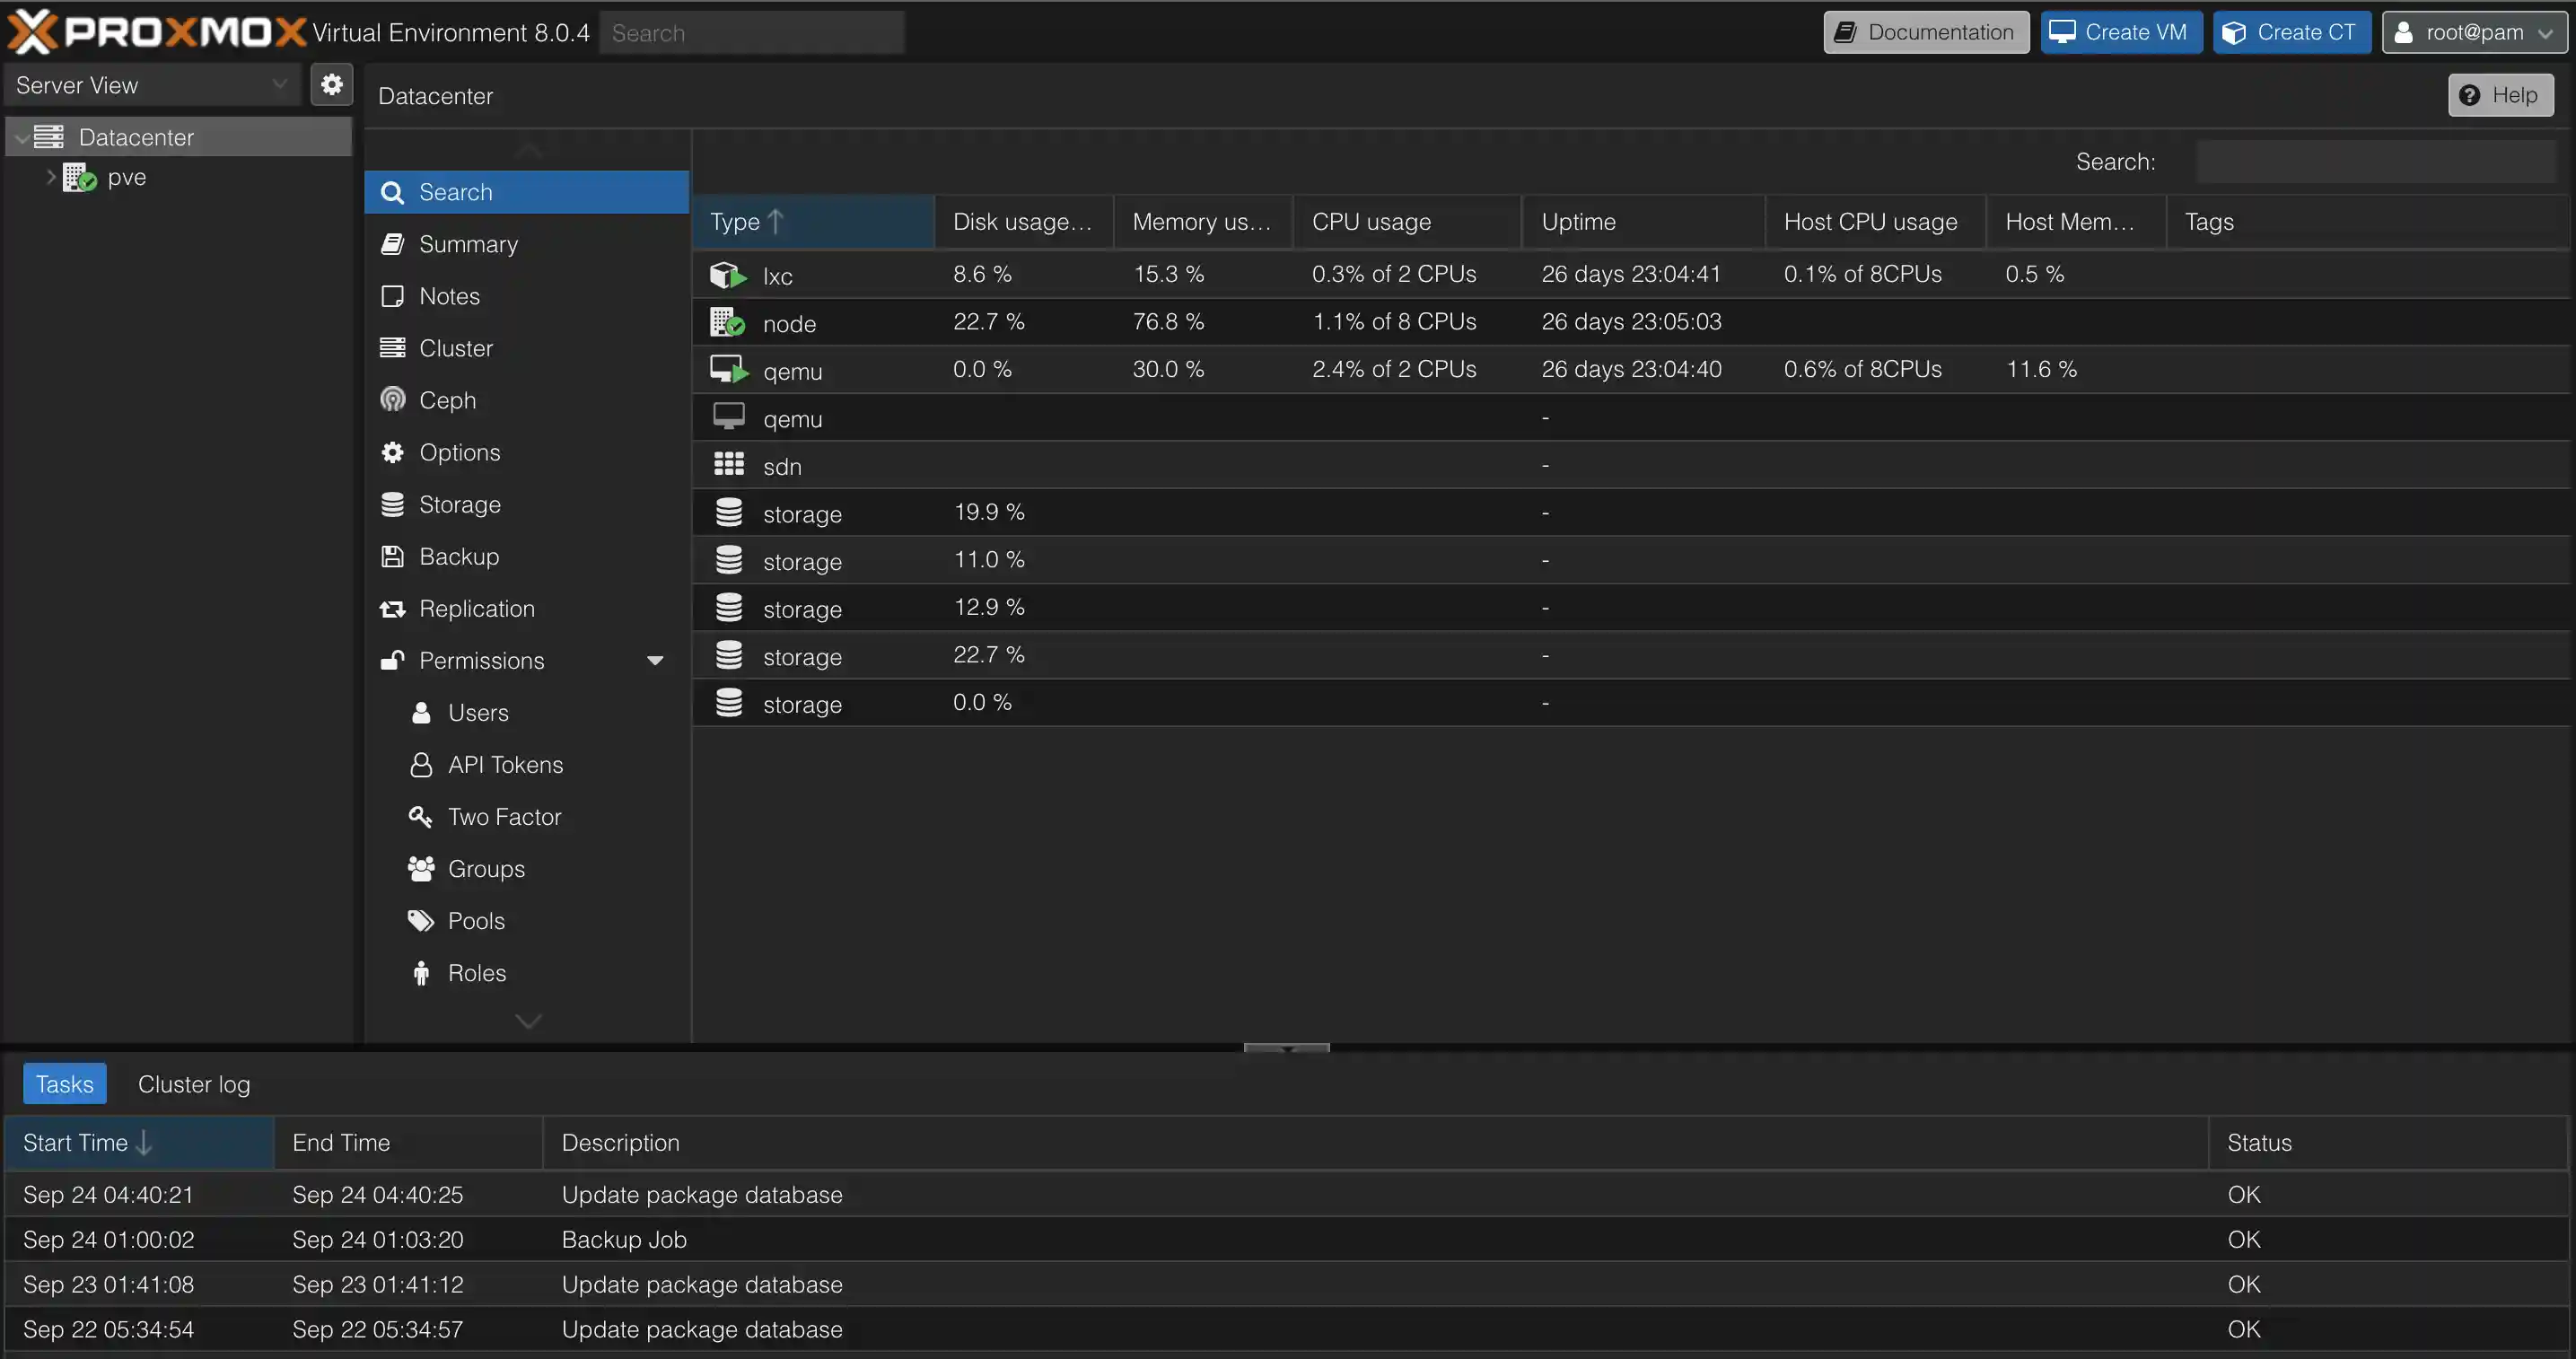
I installed it on an old, fanless computer I had laying around, that I once used for a HTPC running XBMC. It has been living in a box the last couple of years. Feels nice to breath new life into it by turning it into a small virtualization host. It runs a four core i7-3770T mobile cpu @ 2.50GHz with 16GBs of memory - enough to run a few lightweight VMs and containers for a tiny homelab, mainly to play around with stuff.
It had a HDMI CEC card I don’t really need (top left). And a wireless card not capable of access point (AP) mode, which I also don’t really need, so I removed them.
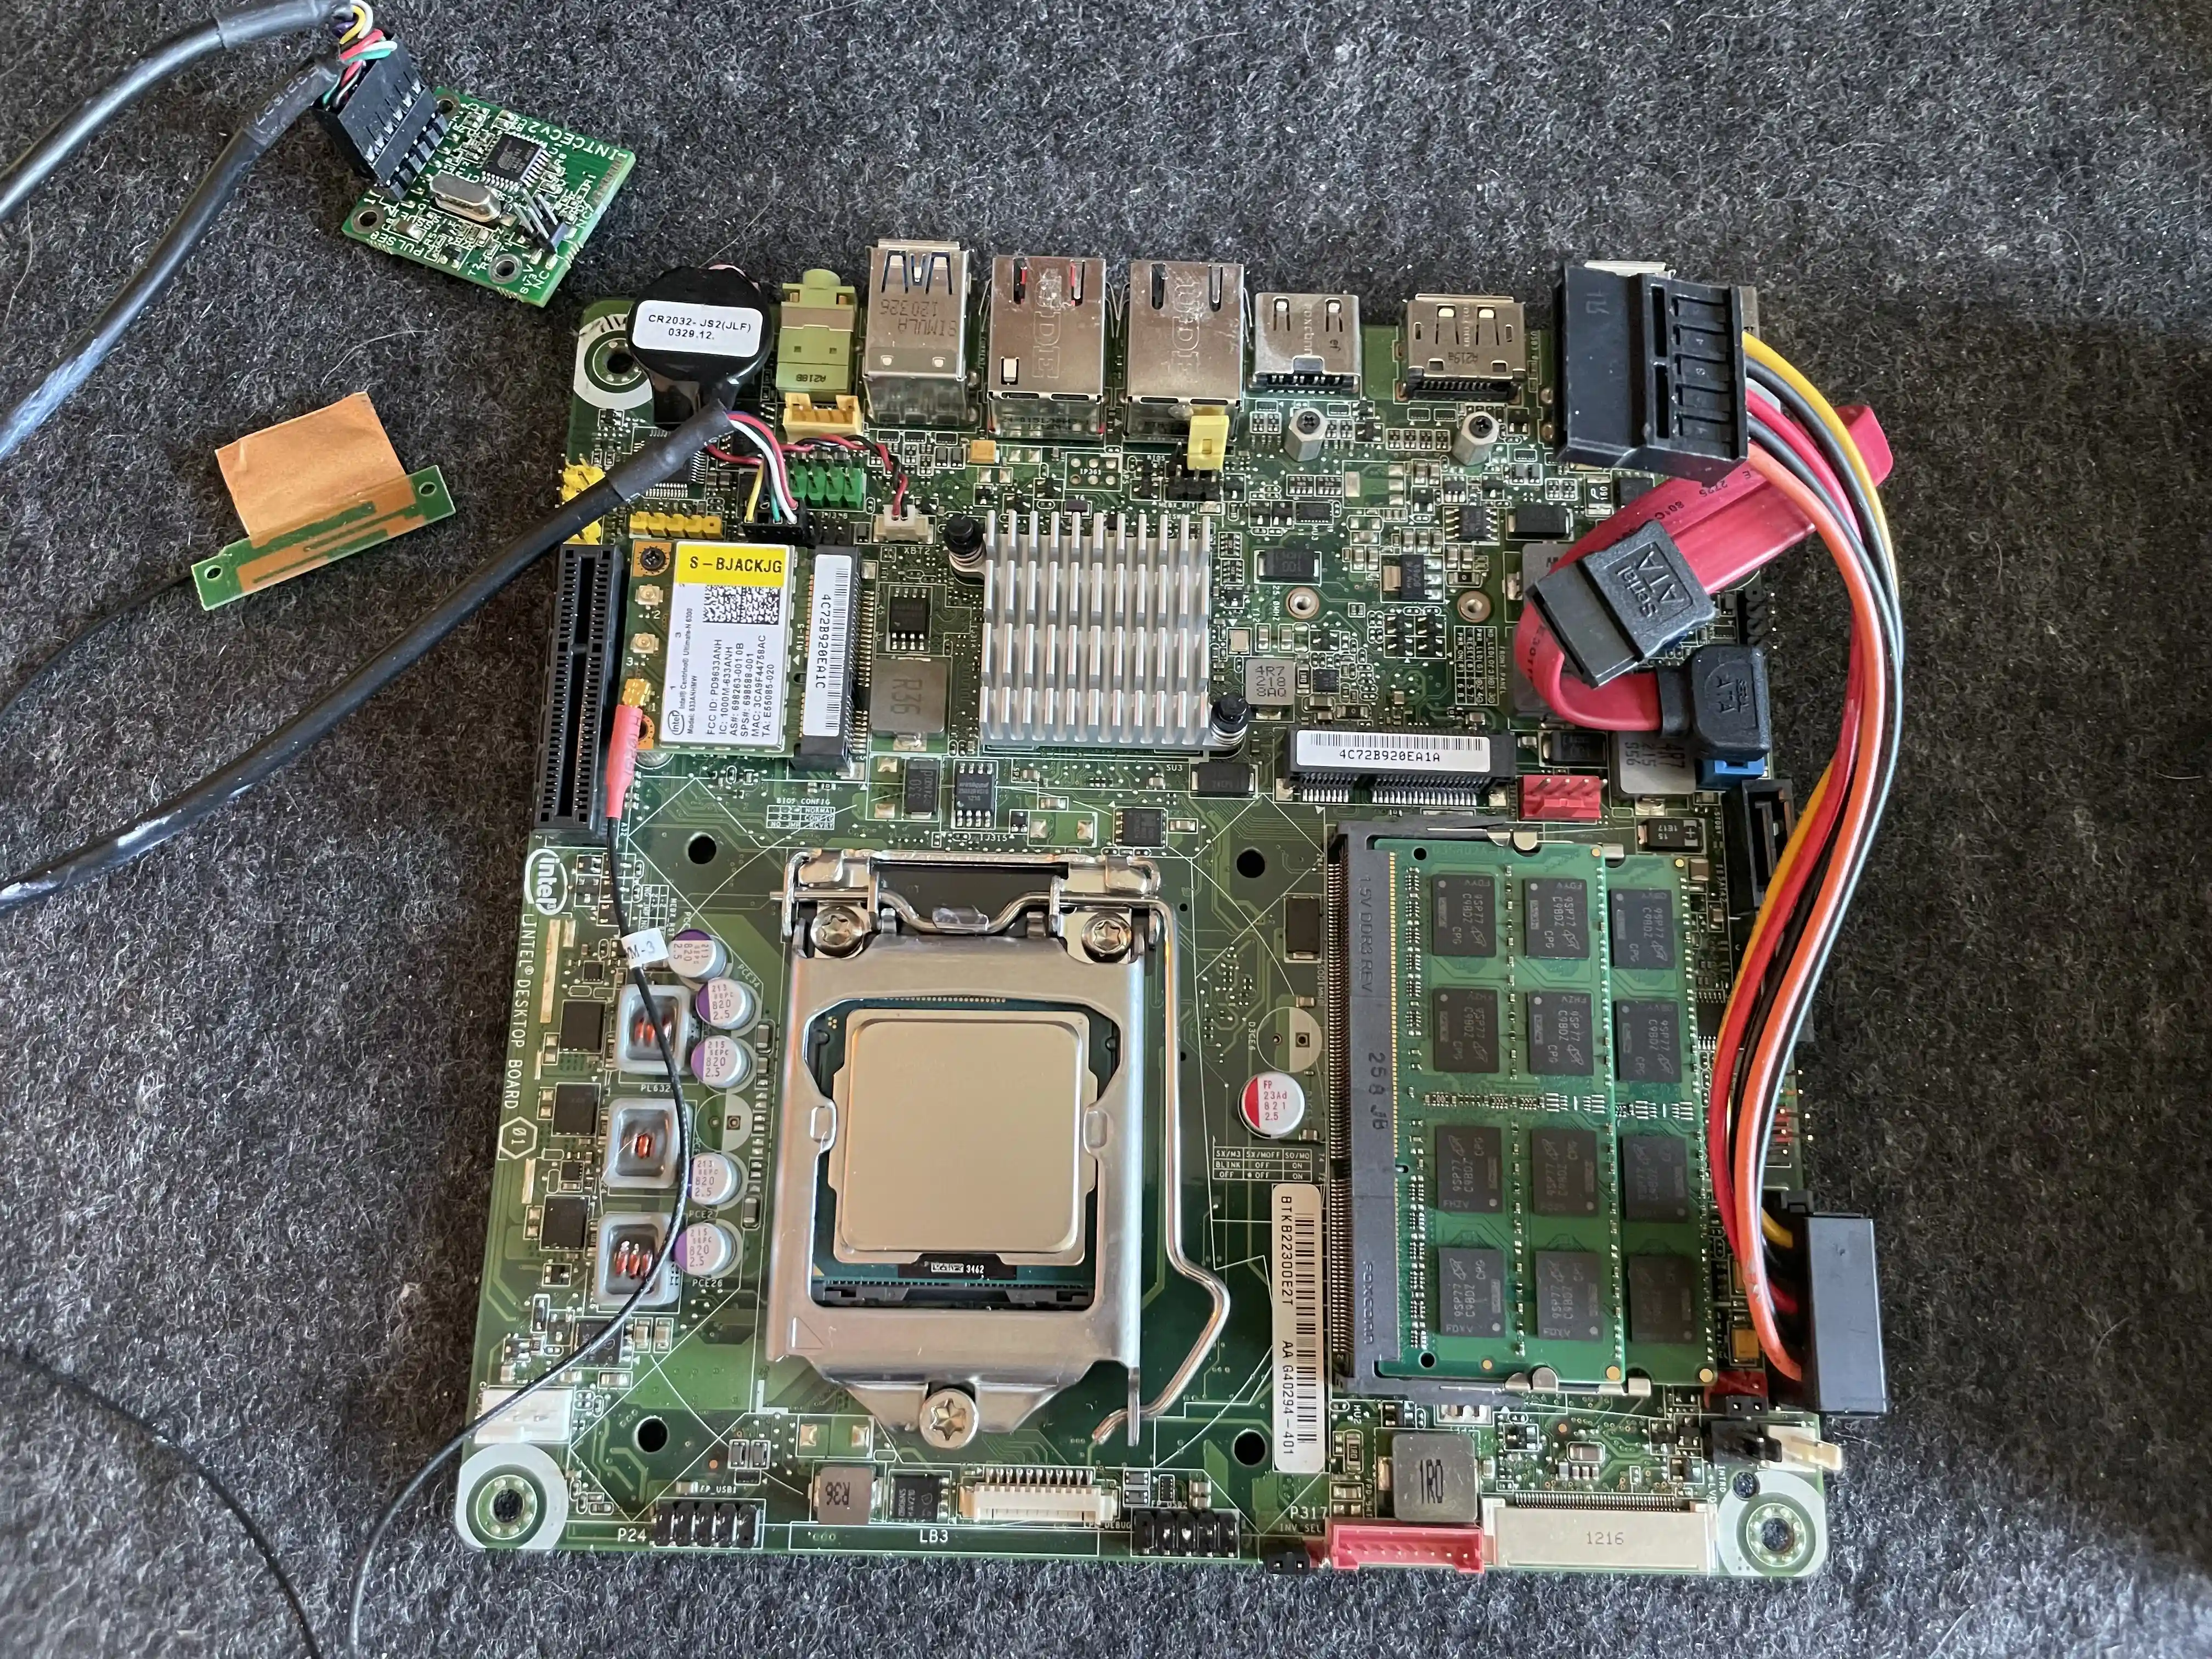
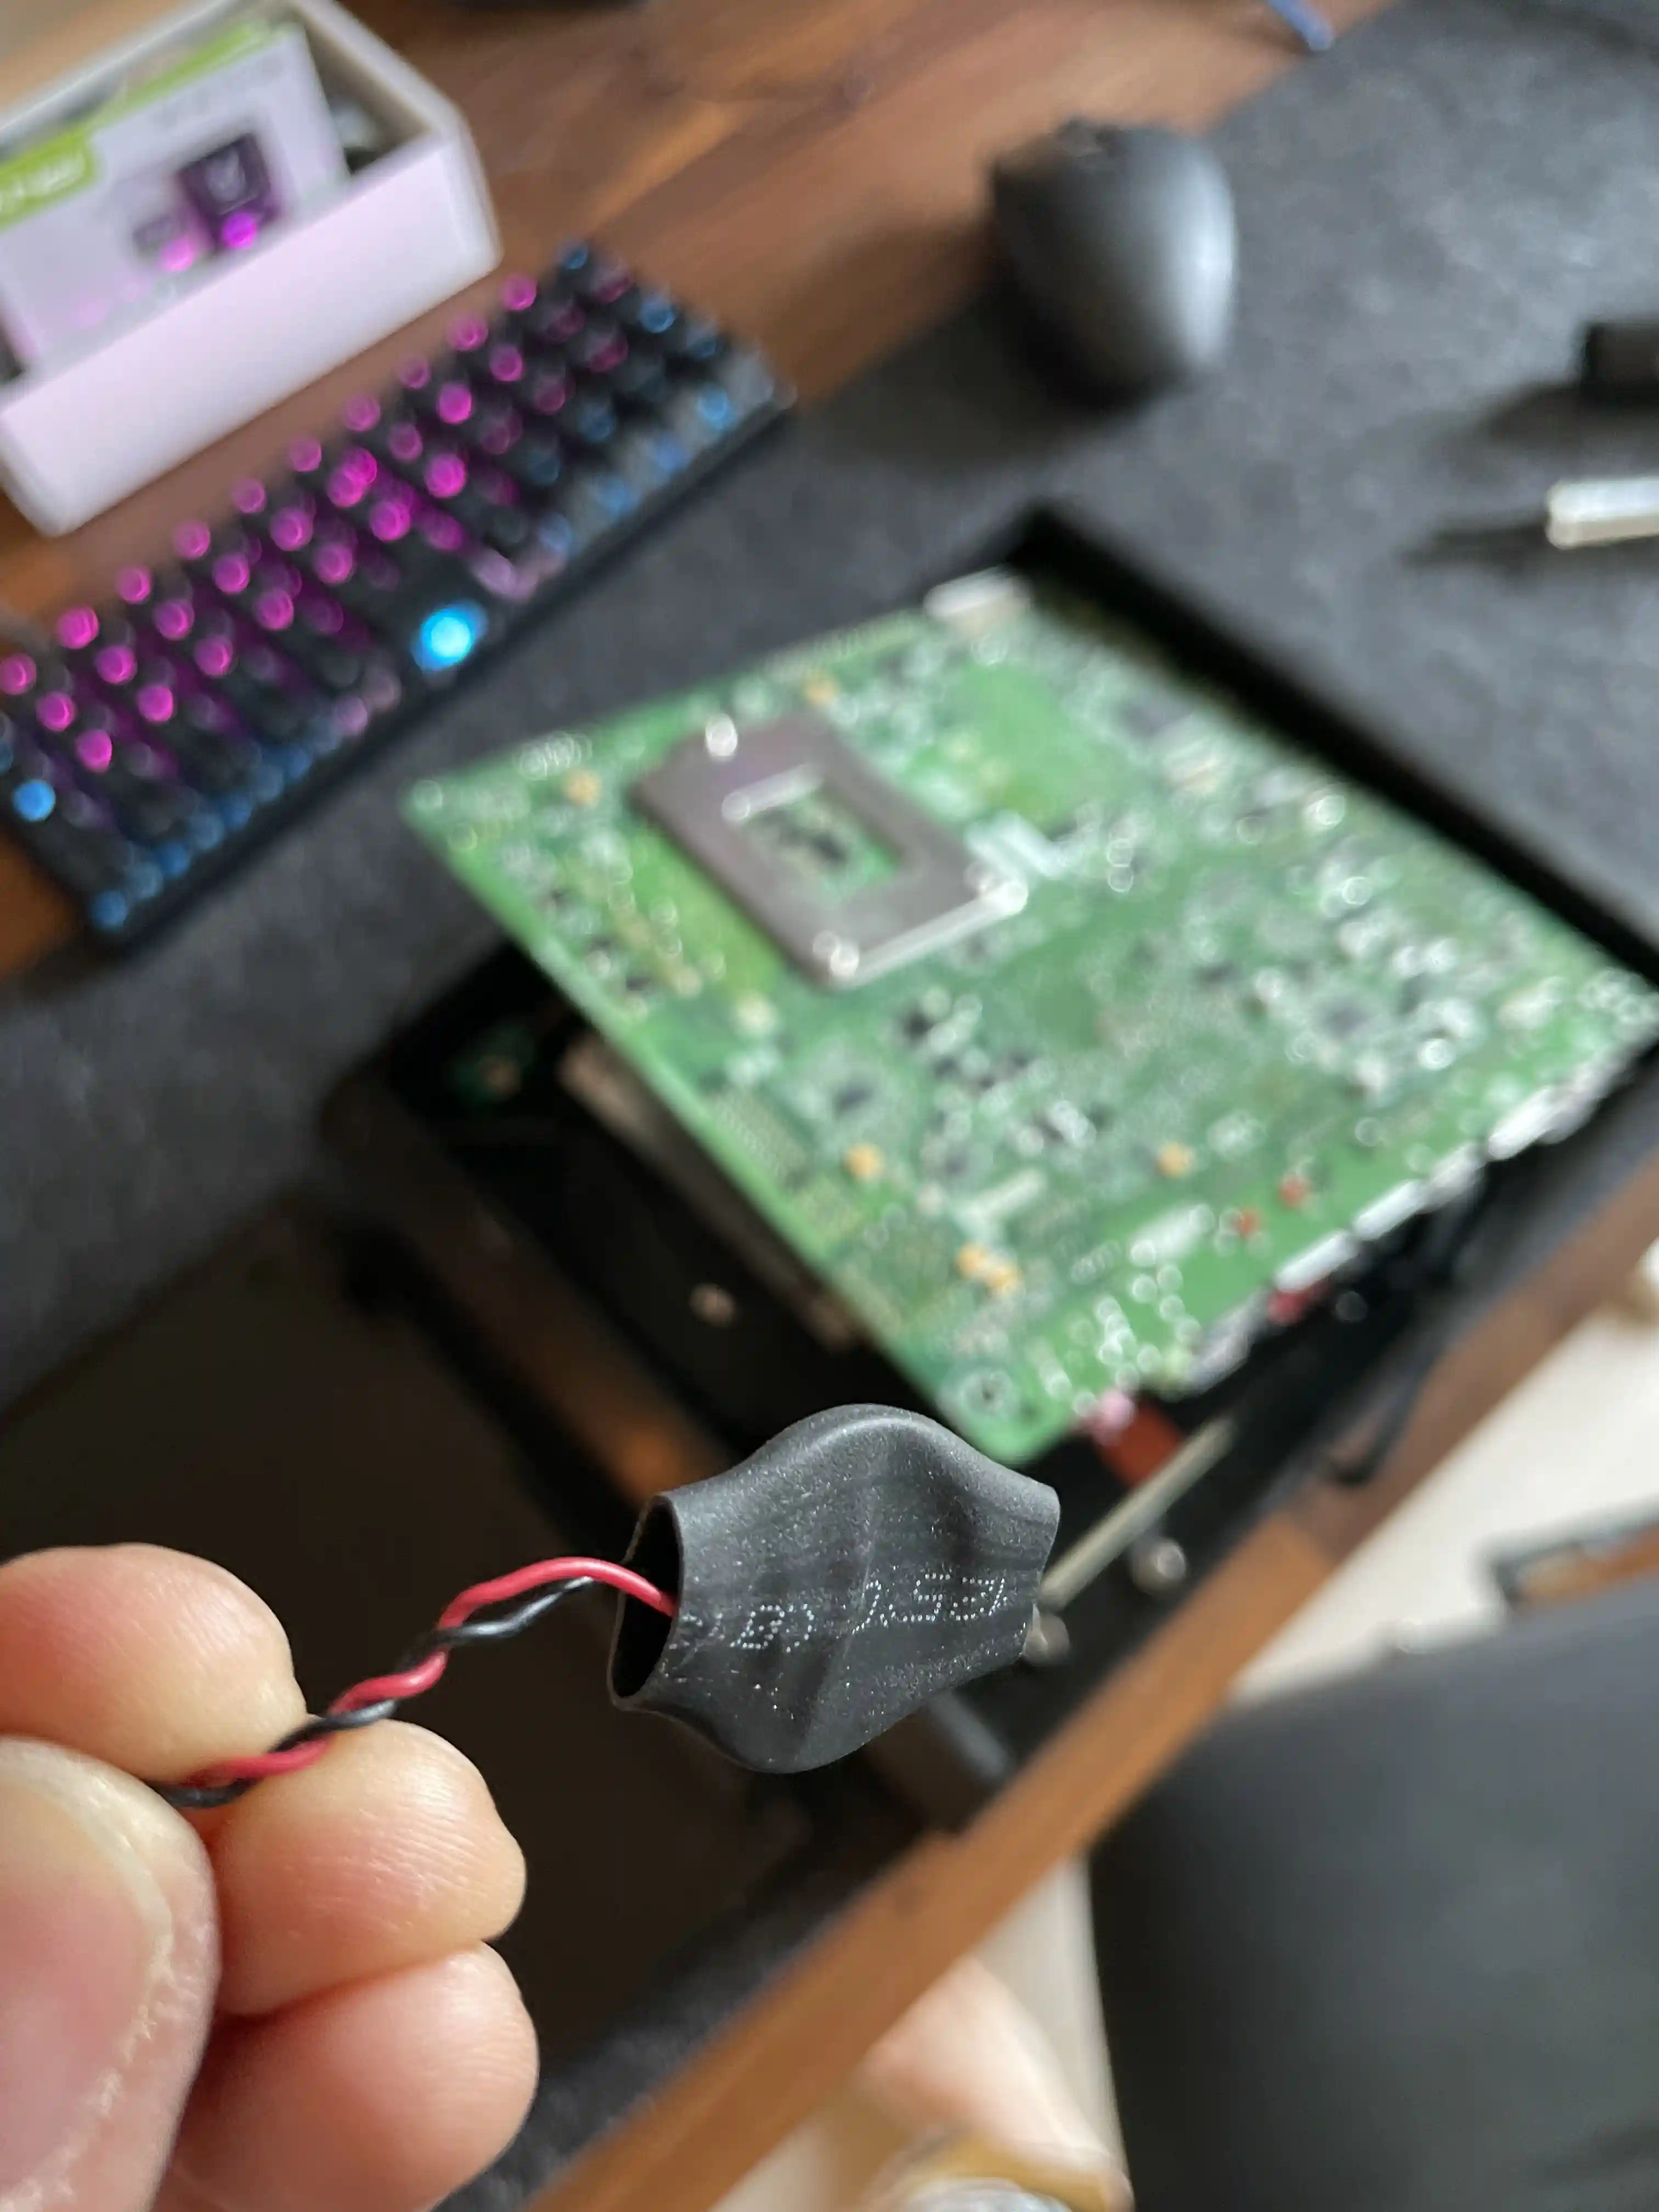
Having stayed in a box for years, the BIOS was not able to persist settings. I tore the soldered connectors off the old battery and bent them just enough that some piece of heatshrink would form a decent contact.
The CPU is only 45W TDP, i.e. the average power, in watts, the processor dissipates when operating at base frequency, meaning the passively cooled case has no issues keeping it reasonably cool.

It hovers around the mid ~40s (°C) with all current services running.
sensors
acpitz-acpi-0
Adapter: ACPI interface
temp1:        +27.8°C  (crit = +95.0°C)
temp2:        +29.8°C  (crit = +95.0°C)

coretemp-isa-0000
Adapter: ISA adapter
Package id 0:  +46.0°C  (high = +90.0°C, crit = +94.0°C)
Core 0:        +41.0°C  (high = +90.0°C, crit = +94.0°C)
Core 1:        +46.0°C  (high = +90.0°C, crit = +94.0°C)
Core 2:        +42.0°C  (high = +90.0°C, crit = +94.0°C)
Core 3:        +44.0°C  (high = +90.0°C, crit = +94.0°C)
I tucked 3 SSDs in there, which was a pretty tight fit, one for the Proxmox OS and two 4TB SSDs that run in a ZFS mirror, for redundant storage for VMs and their data.

There’s no limit to what such a setup can run, really, as long as your hardware can keep up. Heck, people even choose to virtualize their router . Which, on the face of it, seems like a pretty insane idea, tbh. Still, both pfsense and opnsense officially support this. So crazy I might just have to give it a go..
I migrated our Home Assistant install from the Raspberry PI 4 over to this, and set up a simple fileserver to replace an old decommissioned NAS. I also installed Portainer to simplify docker container management. Posts coming up soon™. I don’t need a lot of containers, but I have been meaning to have a go at Grafana and Prometheus for monitoring our hw, and play around some more with docker, docker networking and traefik proxy .
VMs and virtualization is great way to dive head first into tools like Nix, NixOs or Ansible for reproducible setups. Proxmox itself also support terraform, through the Telmate/proxmox provider , for codifying your LXC containers or VM setups.
If, say, your home assistant setup has become an integral part of your home infrastructure, Proxmox can also run clustered, with the ability to transfer your VMs to one of the other nodes, if a node was to go down. This can keep one instance of your VM running at all times. You will need at least 3 nodes to form a cluster able to reach quorum, if you plan on hosting a highly available Proxmox installation. Wendell over at Level1techs has a guide for this running a Proxmox cluster on 3 Intel NUCs .
Here are rough notes of the steps I took to get this rig going, and some interresting tidbits from around the internet regarding Proxmox setups.
Flash a memory stick
List devices
lsblk
Unmount the device
sudo umount /dev/sdX
Find the memory stick you plan to use for installing Proxmox, and flash the image to it
sudo dd if=/home/torgeir/Downloads/proxmox-ve_8.0-2.iso of=/dev/sdX bs=1M status=progress
Connect the management interface
If your machine has multiple network interfaces you plan to make use of for your VMs, make sure to plug just the one you want to manage the machine from before installing Proxmox. The interface that is connected during the install will be the interface that the Proxmox Web Ui is served on once the installation completes. Its a good idea to use another VLAN for this than the one(s) you plan to host your services on.
Interfaces
You can do all of this from the UI, or edit the config files directly. Add auto for interfaces you want to automatically start on boot.
Proxmox adds virtual bridge interfaces for VM connectivity to provide flexibility and isolation. This way you can have multiple virtual networks and assign them to different VMs, making each act like a separate network segment. You can also make these bridges understand VLAN tags, to make selected VMs appear on VLANs already existant on your home network.
Here are two example sections from /etc/network/interfaces. This file is updated automatically if you setup interfaces from the web ui.
This is one for the management interface and its virtual bridge
auto mgmt0
iface mgmt0 inet manual

auto vmbr0
iface vmbr0 inet static
  address 192.168.42.100/24
  gateway 192.168.42.1
  bridge-ports mgmt0
  bridge-stp off
  bridge-fd 0
And one for another interface and its bridge provided for a VM
iface enp1s0 inet manual

auto vmbr1
iface vmbr1 inet manual
  bridge-ports enp1s0
  bridge-stp off
  bridge-fd 0
More about proxmox networking.
Predictable interface name
The BIOS on this machine is old, and Intel stopped providing new updates years ago
. This seemingly creates issues where the network names for the interfaces on the machine are not predictable across reboots. Sometimes their names change, e.g. between eth1 and eno1 - which is pretty annyoing! Probably related to the order in which the physical devices are discovered, I dunno 🤷
Worked around this by forcing an interface name for the management interface based on the card’s mac address. The other interface seem to be named predictably.
ip a
# 3: eth1: <BROADCAST,MULTICAST,UP,LOWER_UP> mtu 1500 qdisc pfifo_fast master vmbr0 state UP group default qlen 1000
#     link/ether aa:bb:cc:dd:ee:ff
Let systemd know about your mapping from mac address => network interface name
cat <<EOF > /etc/systemd/network/10-rename-mgmt-if.link
[Match]
MACAddress=aa:bb:cc:dd:ee:ff
[Link]
Name=mgmt0
EOF
Reboot.
ip a
# 3: mgmt0: <BROADCAST,MULTICAST,UP,LOWER_UP> mtu 1500 qdisc pfifo_fast master vmbr0 state UP group default qlen 1000
#    link/ether aa:bb:cc:dd:ee:ff
Success. Its called mgmt0, every time. ☺️
Disable enterprise update sources
apt complains about these not being available on each update, so I commented the sources out.
sed -i 's/^deb https/#&/' /etc/apt/sources.list.d/ceph.list
sed -i 's/^deb https/#&/' /etc/apt/sources.list.d/pve-enterprise.list
Making them commented out
cat /etc/apt/sources.list.d/ceph.list
#deb https://enterprise.proxmox.com/debian/ceph-quincy bookworm enterprise
cat /etc/apt/sources.list.d/pve-enterprise.list
#deb https://enterprise.proxmox.com/debian/pve bookworm pve-enterprise
Sshd
Copy your ssh key to the machine with ssh-copy-id root@<host>, move sshd to a port of choice, disable password auth, disable root login and restart it.
ssh-copy-id root@<host>
cat <<EOF > /etc/ssh/sshd_config
Port 23
PasswordAuthentication no
PermitRootLogin no
EOF
systemctl restart sshd
SSDs in mirror
The two SSDs needed a GPT partitioning scheme to work with ZFS in Proxmox. Created a RAID 1 mirror configuration from the web ui.
fdisk /dev/sdb
p show info
d delete partition
g gpt partition type
ZFS likes some free space. Add a quota.
zfs List
NAME   USED  AVAIL     REFER  MOUNTPOINT
the-disk   444K  3.51T       96K  /the-disk
zfs set quota=3.16T the-disk
You can create new ZFS datasets from the command line
zfs create -o compression=on -o quota=50G -v the-disk/isos
Useful Proxmox command line tools
Proxmox has a bunch of useful command line tools .
qmfor QEMU/KVMspctfor containersvzdumpfor vm dumpsqmrestoreto restore thempvecmfor cluster management
Rsyncd: Move remainders of the NAS over
Copy stuff from one host to another using rsyncd.
cat <<EOF > /etc/rsyncd.conf
lock file = /var/run/rsync.lock
log file = /var/log/rsyncd.log
pid file = /var/run/rsyncd.pid

[shared]
  path = /the-disk/folder
  comment = shared
  uid = root
  gid = root
  read only = no
  list = yes
  auth users = torgeir
  secrets file = /etc/rsyncd.secrets
  hosts allow = 192.168.x.0/255.255.255.0
EOF
echo "user:pass" >> /etc/rsyncd.secrets
From the other machine
rsync -av Stuff torgeir@<host>.lan::folder
Firewall
Proxmox has a firewall. When you lock yourself out:
pve-firewall stop
This stops the firewall until next reboot or update of any packed what restart the pve-firwall. If you like to disable it permanently, you can do this in the /etc/pve/firewall/cluster.fw set enable: 1 to 0
https://forum.proxmox.com/threads/disable-firewall-from-command-line.29091/
ZFS ashift: Ars technica ZFS 101
EVO SSD should use ashift=13 or ashift=12 . Default is 9.
We strongly recommend even disks that really do use 512 byte sectors should be set ashift=12 or even ashift=13 for future-proofing.
zpool get ashift the-disk
NAME  PROPERTY  VALUE   SOURCE
the-disk  ashift    12      local
ZFS setup fails with LVM volume active
If a drive you try to use in a ZFS pool already has an LVM volume on it, it fails.
lvcscan
lvchange -a n <id>
lvremove <id>
https://forum.proxmox.com/threads/pve7-wipe-disk-doesnt-work-in-gui.92198/page-2
Hardware passthrough
- Intel: Enable
vd-tin bios. In/etc/default/grub, addintel_iommu=oninsideGRUB_CMDLINE_LINUX_DEFAULT. - AMD: In
/etc/default/grub, addamd_iommu=oninsideGRUB_CMDLINE_LINUX_DEFAULT.
GPU passthrough
Untested.
This machine does not have a GPU worth sharing with VMs. I might try this on my main machine one day. This is what the internet seems to agree is nescessary for GPU passthrough.
vim /etc/default/grub
GRUB_CMDLINE_LINUX_DEFAULT="... video=efifb:off"
cat <<EOF >> /etc/modules
vfio
vfio_iommu_type1
vfio_pci
vfio_virqfd
EOF
Help break up iommu groups for easier hw passthrough to VMs. I have no idea what this means.
intel_iommu=on pcie_acs_override=downstream,multifunction video=efifb:eek:ff
https://www.youtube.com/watch?v=fgx3NMk6F54
Reboot
update-grub
update-initramfs -u
Test it
find /sys/kernel/iommu_groups/ -type l
Remove annoying banner
cp /usr/share/javascript/proxmox-widget-toolkit/proxmoxlib.js proxmoxlib.js.bak
sed -Ezi.bak "s/(Ext.Msg.show\(\{\s+title: gettext\('No valid sub)/void\(\{ \/\/\1/g" /usr/share/javascript/proxmox-widget-toolkit/proxmoxlib.js && systemctl restart pveproxy.service
Resources
- https://staging.forty.sh/posts/2021-01-15-renaming-network-interfaces/
- https://forum.proxmox.com/threads/renaming-network-interfaces-proxmox-7.111010/
- https://www.youtube.com/watch?v=fgx3NMk6F54
- https://forum.proxmox.com/threads/gpu-passthrough-radeon-6800xt-and-beyond.86932/
- https://forum.proxmox.com/threads/iso-storage-on-zfs-possible.82942/
- https://superuser.com/questions/488662/can-two-seperate-zpools-exist-on-the-same-physical-devices
- https://arstechnica.com/information-technology/2020/05/zfs-101-understanding-zfs-storage-and-performance/
- https://johnscs.com/remove-proxmox51-subscription-notice/